Here's a Commodore 16. At first glance, it looks a lot like the Commodore 64, but it's got a black chassis and grey keys. This computer came out after the C64, but is actually the next version of the Commodore Vic-20. It's kind of confusing, which might be why this didn't sell all that well in North America. It was apparently pretty big in Europe though.
The computer I bought is in pretty good condition overall. Thanks to the black color, it hasn't yellowed and requires no retr0brighting. It powers up and boots to the BASIC screen, but power is where I found the first problem.
Here's the power supply that came with it. It does power up the machine, but it's held together with some electrical tape. After testing it with a multimeter, I was getting way higher readings than 12 volts, so I only let it power on for a few seconds. This PSU is unregulated and probably very dangerous for the computer. But at least I know the computer works.
Moving on to the chassis, the Commodore label has lifted a bit. I hate messing with these because they bend very easily.
The bottom looks just as good as the top, but there aren't any rubber feet. I'm not sure if the original had them, but the empty circles look weird.
Opening the Commodore 16 is much easier than the Commodore 64 or Vic-20. Those use latches that tend to snap off if you're not extremely careful. The C16 top lifts off with no resistance once you've removed the screws.
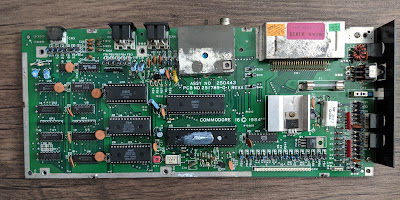
Despite the compact board, the C16 kept the same size and form factor as its predecessors. It would have been cool if they shrank the design down a bit, but they didn't do that.
I then removed the RF shield and board from the bottom of the chassis to get a look at the board itself.
Aside from some metal discoloration, this board looks fantastic. It's going to need some new thermal paste and I'll definitely be replacing the capacitors at some point, but other than that I don't plan to do much to this.
The bottom has the same discoloration as the other metal parts. On a Commodore 64, the lower RF shield is soldered into place. The C16 only has little twisty parts of metal that need to be bent.
Nice. This is a really clean design, and the shield did an excellent job of protecting the board.
Overall, the interior doesn't look bad. But with a computer this old, there's got to be something really gross hidden somewhere.
Eeeewww.
Okay, it's not all that bad.
I mean, it's pretty bad. But this is what every keyboard I've worked on has looked like. I'm going to need to do a complete disassembly of the keyboard to get every last bit of debris out of it. I've done that many times before.
I don't have any software for the C16 and my SD2IEC isn't compatible with it, so I don't really know what I'll do with this thing once I've cleaned it. I managed to find this computer on Ebay for very cheap because the seller didn't know if it worked.
Anyway, that's all for now. Part 2 will be cleaning and reassembling the C16 with before and after pics. There isn't going to be a very dramatic difference.
Thanks for reading!


I didn't even know the Commodore 16 even existed....cool!
ReplyDeleteAt what price did you purchase this C-16? I just bought one at the price of € 70 (with datasette 1531, a book and a lot of tapes. Power supply was disfunctional, but with another one the C-16 booted up very well. Screen and audio ok, so no TED damage I suppose. Evenso BASIC en Kernal Roms, no memory issues. Nice.
ReplyDeleteI don't remember, but I got it pretty cheap because it was listed as non-working due to the damaged power supply. I still haven't managed to find a replacement for the power supply so I haven't done much with this C16.
Delete