31 May 2019

Commodore Project 64 Part 3 - Retr0bright Phase 2, More Keys

After the success of the first retr0bright, I was confident I had everything I'd need to get this computer looking the way I want it. The 40 Volume Creme is definitely the way to go.

With that, it was time to brighten the rest of the chassis as well as the Canon P101-D calculator.
I woke up extra early since the sun was supposed to rise around 5:30 AM. I wanted to maximize the amount of time everything would be exposed for the best results. Unfortunately, because of the position of my porch, the sunlight was nowhere near available. I waited a few hours and finally had some light to work with.

And this is where I started to find problems with this method. There are a lot of trees around me, and there's another porch above mine. Because of the narrow area of sunlight I get each day, I had to move everything every half hour or so. This was very annoying.

But I persisted, and found that my porch gets a total of about 2 hours of sunlight during the day. Most videos I've seen of successful retr0brights have their parts out for six to twelve hours.

Here's a comparison shot of the bottom of the Vic-20 case. The first brightening attempt was great, but the second didn't make much of a difference. It seems retr0brighting has diminishing returns, so I would need a way to keep everything in direct UV light for an extended period of time.

But it wasn't all disappointment. Here are comparison shots of the other parts.

The difference between before and after with the calculator was incredible. The dark orange has become a light shade of pink. It has a long way to go before it's back to normal, but I was happy with the results of just a few hours of sunlight.

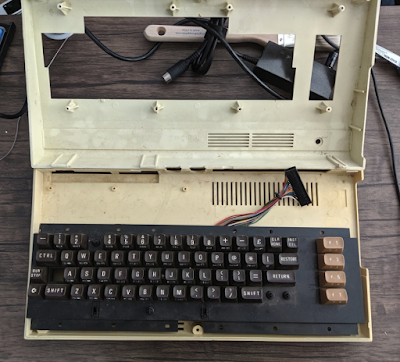
The top of the chassis looks WAY better now. Most of the yellowing is gone, and the ugly stain on the left side is completely gone. 

Also, one of the most concerning parts of the case looks significantly better. 

Still, this wasn't enough to satisfy me, so I needed to take drastic measures to get this case looking fantastic. Tune in to Retr0bright Phase 3 some time next week.

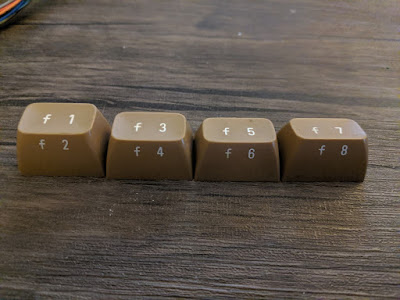
Moving on from that, I made a shocking discovery about the keys of the Commodore 64: they aren't all the same. 
As you can see, the slope of the top changes between the f keys. Did this also mean that the other keys were different?
Yes, it did. I was mistaken when I thought the key I 3D printed from Thingiverse wasn't accurate. It turns out it was the same as the top row. This means I'll need to design two more keys-
God damn it. 

29 May 2019

Commodore Project 64 Part 2 - Retr0bright Phase 1


A while back I attempted to retr0bright a disgustingly oranged calculator. It did not work. I used 40 volume hair creme, which has a lot of hydrogen peroxide, the key ingredient in making things whiter. Vintage enthusiasts swear by the stuff, so I pick up a gallon of it from Sally Beauty for like $10. The mistake I made when attempting to de-orange that calculator was I never left it in the sun. It turns out you need ultraviolet light to activate the hair creme.

So with today's post, I want to revisit that device as well as move forward with the Commodore Project 64.

I think the bottom of the Vic-20 place is the best place to start. It's the worst-looking part of the chassis, but if I screw it up, the damage won't be visible from above at least. I began by removing all of the rubber feet and then used a heat gun to cleanly remove the product sticker. I also scrubbed all of the parts with soap and water, and used an abrasive pad to remove any marks.

Removing the sticker revealed the true color of the Vic-20 chassis. This would help me figure out when the case was looking the way it should. With this point of comparison, I brushed the 40 volume creme all over the surface and laid clear plastic wrap over that to keep debris from getting in it. 

This went outside onto my porch, which only gets a few hours of sunlight each day.

I had to move it twice over the following hours so it would always be in direct sunlight. I also rotated the piece so that every area would be affected.

And here's the result of the first phase:
The difference is huge. The yellowing was reduced significantly. I'm pretty happy with the results so far, but there's still work to be done. 


While cleaning the top of the chassis, I found some nasty damage had been done to the vent. I believe this was caused by a candle because I've also found wax between some of the keys and in other parts of the chassis. My guess is a candle fell over onto this machine at some point in the past. 

It's unfortunate to see this kind of damage, but I'm hoping the retr0bright will lighten that area up and make it less noticeable. 

In Phase 2, I'll be doing the entire case as well as that ugly orange calculator. Thanks for reading!

If you're interested in retr0bright, here are some places to start:

https://www.retr0bright.com/ - a website dedicated specifically to it.

And this video:

In fact I recommend watching ALL of the 8-Bit Guy's videos. His content is fantastic and he has been a huge inspiration to me. 

26 May 2019

Something Different: Commodore Project 64 Part 1

Hello, and once again, sorry for the lack of content. I've been busy with several projects and haven't had much motivation to work on calculator reviews. The original joke was that the calculator reviews would all pretty much be the same, but the reality is that joke isn't very funny after several months. That doesn't mean I won't be doing more calculator reviews, but they will be less common and will be for devices that have something notable about them.

I follow several vintage electronics enthusiasts on YouTube and have found their projects to be fascinating. It has inspired me to build a custom Commodore 64 computer of my own. I have several working machines and one that does not work at all. The shell of that one was re-purposed for a retro gaming machine powered by a Raspberry Pi.

Commodore 64 Assy 326298 Rev A, from 1982.
That left me with a board that didn't function. I've replaced the capacitors and swapped out most of the chips for tested working ones, but it still won't give me anything more than a black screen. I've even tried using the Commodore 64 Dead Test cartridge, but even that won't give me any sort of output.
The Commodore Dead Test cartridge.
I've given up on this machine several times, but I don't have the heart to get rid of it. I want to figure out what's wrong and have it up and running again. Sure, I could just get another board, but I'm interested in the challenge of making a 37 year-old machine working again.

So I have dubbed this my Commodore Project 64. I want to turn it into a custom computer with features my stock computers don't have. I personally prefer the original machines, but I want to have some fun with this. The one rule I want to stick with as best I can is that I will only use parts from original machines that are beyond repair and would likely never be used for regular machines again.

I was inspired by Adrian Black's Creamy Dreamy C64:


He used a Commodore Vic-20 case for a very beautiful end result. So with that, I hunted down the worst Vic-20 case I could find on Ebay.

Commodore Vic-20 Case.
This thing is a mess.

The good news is that the case itself isn't broken, just very gross. Several keys are missing, but that's okay because I've got a plan for those.

One of my favorite creators on YouTube, Perifractic's Retro Recipes, built this amazing machine. Since he wanted to only use parts that were recently manufactured, his options for keys were limited. He went with Lego Bricks, which is a neat idea, but I personally hated that. 

So I've been designing 3D printed keys to be used on my Commodore Project 64. This part alone has proven to be a grueling process. Some people have attempted to replicate these keys, but I don't like how they've turned out.

The leftmost blue key was my first print of a C64 key, and it came from a user by the name of Yangsong on Thingiverse. Click here if you want to get a look at the CAD files. The key looks and functions nicely, but it's not quite right for the Commodore 64. It may be a different design that user is basing it on, but I don't know for sure. The mess on the inside is just printing supports I haven't bothered to remove because they have no effect on the end result.

The key in the middle is my design so far. The dimensions are much closer to the keys I'm working with.
Here's a view of the key in CAD. It's still not to my liking, but I've been making adjustments and printing it over and over and getting closer to something amazing. I do want to make the design publicly available when it's finished so that others can print their own keys.

So this is where I am now with the project. The Vic-20 case needs to be thoroughly cleaned and retr0brighted. Now that my area is getting sun, I should have better luck with that. The 3D printed keys need to be refined and I'll need to figure out what sort of color scheme I want to go with. And of course, I need to get the board working again.

In the meantime, I'd like to post occasional updates on this project. I've got more parts and things I'll need ordered but it could be several months before I have all of them.